Multiple PC installations |


|
Multiple PC installations |
|
When required the 'Per-machine' Mail Manager for Windows Installer (MSI) can be pre-configured for deployment to multiple PC's, eliminating the need to enter the activation details each time the software is installed. Also by using a "Shared Configuration Folder" you are able to update everyone's users preferences and filing locations at any time without reinstalling Mail Manager.
| • | Ensure the prerequisites are satisfied |
| • | Perform a 'Per-machine' single PC installation |
| • | How to licence the software |
The Shared Configuration Folder is used to control user preferences and what collection files are loaded automatically using using the following files.
| ➢ | User Preferences via the AdminEmailFiling.cfg |
| ➢ | Shared filing locations via the Collections.txt |
Open the sample folder in the installation folder e.g.
C:\Program Files\Mail Manager\Sample
and copy the "Mail Manager Config" folder together with its contents, to one of the following systems.
Note: All users will need at least read access to this folder and its contents.
Network folder:
Can be specified using a Drive or UNC path e.g.
Drive: G:\Mail Manager\Mail Manager Config
UNC: \\Server01\General\Mail Manager\Mail Manager Config
SharePoint:
Within your SharePoint admin center create a new site (site collection) called: Mail Manager
Copy the "Mail Manager Config" folder together with its contents, from the sample folder (see above) to the default document library of the site e.g.
https://mailmanager.sharepoint.com/sites/MailManager/Shared%20Documents/Forms/AllItems.aspx
Viewpoint:
Within your Viewpoint enterprise create a new site called: Mail Manger with a document container called: Mail Manager Config e.g.
Open the sample folder in the installation folder e.g.
C:\Program Files\Mail Manager\Sample
and copy the contents of the "Mail Manager Config" folder into the document container.
|
When required set the folder and file permissions on the Shared Configuration Folder so that they are read only to general users, but writable to those users who administer control over users preferences and collection files |
| • | Open the MSI configuration tool, called MsiConfigure.exe located in: C:\Program Files\Mail Manager\Support the following window will appear: 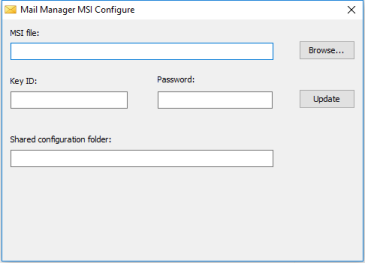 |
| 1. | Enter the path or browse to the downloaded installer (.msi file) |
| 2. | Enter the licence activation details emailed to you after purchase. Note the password is case-sensitive |
| 3. | Enter the path to the "Shared Configuration Folder" e.g. Network folder: Drive: G:\Mail Manager\Mail Manager Config UNC: \\Server01\General\Mail Manager\Mail Manager Config SharePoint: Ensure the path is prefixed with Sharepoint: e.g. Sharepoint:https://mailmanager.sharepoint.com/sites/MailManager/Shared%20Documents/Forms/AllItems.aspx Viewpoint: Ensure the path is prefixed with Viewpoint: e.g. Viewpoint:Mail Manager\Mail Manager\Mail Manager Config\ |
| 4. | Select the Update button to save configuration details to the MSI file |
Alternatively the installer can be deployed using command line options without having to pre-configure the installer.
|
The path to the "Shared Configuration Folder" entered above is stored in the PC's Windows registry e.g. |
| • | Using the Locations tool create one or more Collections (.mmCollection) and save the Collection file/s into the “Shared Configuration Folder”. |
| • | Using a plain text editor e.g. Notepad, open, edit and save the Collections.txt file to include your list of Collection files. For more information see: Collections.txt |
An administrators tool is provided that can be used to centrally update and control users User preferences e.g. you can update "Prompt to file sent messages" and lock it so the users are always prompted to file messages that they send, for more information see Admin Preferences.
To ensure that the "Shared Configuration Folder" is working as expected carry out the following:
| a) | Exit Outlook |
| b) | Un-install Mail Manager (Re-installing without un-installing will not update the Windows registry key). |
| c) | Re-install Mail Manager using the pre-configured installer (.msi file) (see Step 3 above). This will ensure the path to the "Shared Configuration Folder" is applied. |
| d) | Restart Outlook |
| e) | From the Windows Notification Area (bottom right-hand corner of the screen) select the Mail Manager icon  |
| f) | Check via Tools > User preferences that the your changes made during Step 5 have been applied. |
| g) | Check by opening the Locations tool that the list and state of the Collection files are as configured during Step 4. |
The pre-configured installer can be installed onto users PC's in many ways e.g.
| • | Installed from a shared folder |
Following good practice we recommend a phase deployment procedure.
"Unable to run Mail Manager. Microsoft .NET Framework Version is required"
The Microsoft .NET Framework 4 is required to run Mail Manager for more information refer to the Prerequisites
User preferences not updating
| • | Check item e) listed under "Step 6: Testing". If the Shared Configuration Folder is not specified or is not correct repeat Step 3, un-install and re-install Mail Manager. |
| • | If the Shared Configuration Folder is specified correctly open the MailManager.Preferences.exe (see Step 5) and ensure the Update check box is selected next to the preference/s that need to be updated. Select the Save button. After 20 seconds reopen and check the User Preferences window. |
Also see: