Exchange Online Public Folder migration to SharePoint
Overview
Used to batch file emails from Exchange Online public folders directly to SharePoint filing locations.
Note:
Requires a Windows PC with Mail Manager installed and approval of the Mail Manager EWS app
Prerequisite:
Ensure the migration tool is enabled by including the following variable in your EmailFiling.cfg
EnableExchangeMigration=1
Share locations with mobile devices must be enabled via the User Preferences > Microsoft 365
In Use
How to batch file a public folder to SharePoint
1. Add and approve the Mail Manager EWS app via your Azure Active Directory admin center portal Approve now
2. Identify a PC with Mail Manager installed that can be used for the batch filing.
3. On the machine run the MailManager.BatchCloudFiler.exe that can be found in the Mail Manager installation folder e.g.
C:\Program Files\Mail Manager\x64
or
%localappdata%\Mail Manager\Program Files\x64
The following window will appear:
4. Select Authenticate and enter your Microsoft 365 credentials
5. Select Add Batch the following window will appear: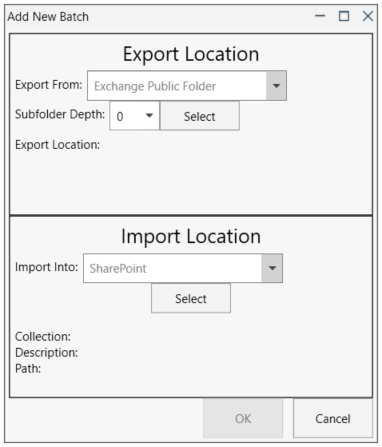
6. Select the public folder to export
i. Choose the Sub-folder Depth of the folder to be exported, then press the Select button
ii. Choose the required folder to export
7. Choose the SharePoint location where the emails will be migrated to, then select OK
Note: Multiple batches can be added
8. Choose a batch and select Start Migration. The selected batch will begin copying emails to the chosen SharePoint location
9. Progress details are displayed at the bottom of the window
10. When the batch is complete another batch can be started
11. Select Generate Report to see a summary and details of a batch
|
|
Our tests indicate that is takes an average of 1.5 seconds to file each email e.g. 10 hours for 24,000 emails. |